



Open your site on your phone, on mobile data, and watch what happens. If a big photo crawls in from the top while the text jumps around underneath it, you’ve found the problem. Most slow WordPress sites share the same cause, and it usually isn’t the host, the theme, or the plugin you’ve been blaming.
Images tend to be the heaviest part of a page; a single photo straight from a phone can weigh 4 MB or more, and a blog post with eight of them can ask a visitor to download more data than the entire rest of your site combined. The good news is that WordPress image optimization is one of the few speed fixes that’s both cheap and dependable.
This WordPress image optimization guide covers what actually works: how to size images, which format to pick, how to compress without wrecking quality, which plugins are worth using, how lazy loading can help or hurt, and how to handle image SEO properly. Near the end, I’ll also explain how WPAegis can take the whole job off your plate if you’d rather not do it yourself.
Why Image Optimization is an important part:
Let’s start with the obvious reason, then get to the ones people overlook.
Page speed and visitor behavior
Visitors don’t wait around. When a page takes too long to show something useful, people hit the back button, and most of them never come back. Heavy images are the most common cause of sluggish pages, especially on mobile connections where every extra megabyte counts.
Core Web Vitals and rankings
The metric in Core Web Vitals that is most affected by images is Largest Contentful Paint (LCP), because it tracks how long it takes for the biggest visible element to appear.
On most blog posts and landing pages, that element is an image: a hero photo, a featured image, or a banner.
Google considers an LCP of 2.5 seconds or less to be good, but if your hero image is 3 MB, hitting that number on a typical phone connection is close to impossible. Page experience isn’t the only ranking factor, and great content still wins over a fast but empty page, but when two pages are comparable, speed can be the tiebreaker.
Layout shift matters too because when an image loads without reserved space, the text jumps down as it appears. That’s Cumulative Layout Shift (CLS), and it’s irritating for readers as well as a signal Google tracks.
Hosting costs and server load
Every image request uses bandwidth and server resources. If you’re on shared hosting with a monthly transfer cap, a library full of oversized images can push you toward overage fees or throttling. Smaller files mean less strain on your server, faster backups, and a smaller storage footprint.
Image search traffic
Images can bring in visitors by themselves. Google Images and Discover send real traffic to sites that treat their visuals seriously. If your product photos, diagrams, or infographics are optimized and described well, you give them a chance to show up where people are looking.
What WordPress Does for You (and Where It Stops)
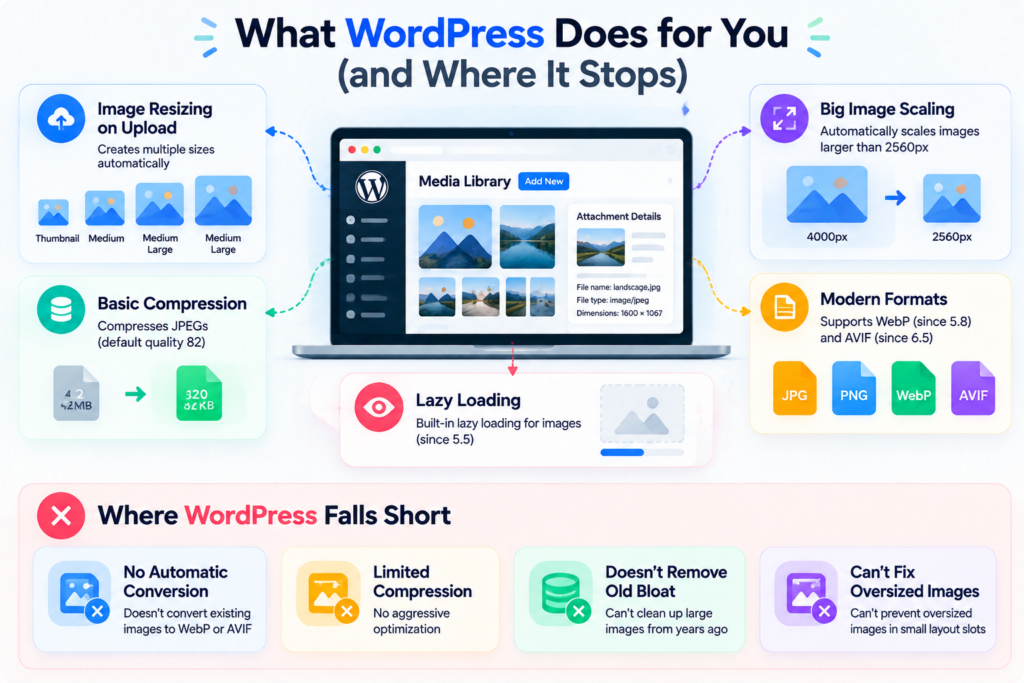
WordPress has gotten better at this over the years, and it’s worth knowing what’s already handled so you don’t duplicate effort.
Image resizing on upload:
Every time you upload a picture, WordPress generates several smaller copies: thumbnail, medium, medium-large, and large, along with any sizes your theme or plugins register. This is what lets a thumbnail grid load small files instead of full-size originals.
Big image scaling:
Since WordPress 5.3, WordPress automatically scales down any image wider or taller than 2560 pixels; that helps, but 2560 pixels is still enormous for a blog post.
Basic compression:
WordPress compresses JPEGs when it creates those resized copies. The default quality setting is 82, which is a reasonable balance but isn’t tuned for your content.
Modern formats:
WebP uploads have been supported since WordPress 5.8, and AVIF support arrived in WordPress 6.5. Support depends on your server’s image library, so it’s worth checking rather than assuming.
Lazy loading:
Native lazy loading has been in core since WordPress 5.5, and newer versions are smarter about not lazy-loading the first image on a page.
So where does it fall short? Core doesn’t convert your existing library to WebP or AVIF automatically. It doesn’t do aggressive compression, it doesn’t remove bloat from images you uploaded years ago, and it can’t fix an oversized image that’s been placed in a small slot by your theme. That’s where manual habits and a good plugin come in.
Step 1: Get the Dimensions Right Before You Upload
The biggest mistake I see is uploading a 4000-pixel-wide photo into a layout that displays it at 800 pixels. WordPress will generate smaller copies, but the original still sits in your library, and some themes accidentally serve it anyway.
Look at your theme’s content width first because most blog themes display the main column somewhere between 700 and 900 pixels wide. If you want crisp images on high-density screens, doubling that is plenty. Anything beyond that is wasted bytes.
Here are rules of thumb that work for most sites:
| Image type | Suggested width | Target file size |
| In-post images | 1200–1600 px | Under 150 KB |
| Featured image/hero | 1600–2000 px | Under 250 KB |
| Full-width background | 1920 px | Under 300 KB |
| Thumbnails and cards | 600–800 px | Under 60 KB |
| Logos | As small as possible, ideally SVG | A few KB |
These aren’t rigid rules. A photography portfolio will justify heavier images than a text-first blog. But if you keep roughly to these numbers, you’ll be ahead of most of the web.
Step 2: Choose the Right Image Format
Format choice changes file size dramatically, sometimes more than compression settings do.
JPEG is still the workhorse for photographs. It’s universal and compresses well, but it’s no longer the most efficient option.
PNG is lossless and supports transparency, which makes it good for screenshots with sharp text, logos, and simple graphics. It’s also very heavy when used for photos. If you’ve saved photographs as PNG, converting them is one of the easiest wins available.
WebP is the sensible default for most WordPress sites right now. It typically produces files noticeably smaller than JPEG or PNG at similar visual quality, supports transparency, and works in all modern browsers.
AVIF compresses even better than WebP in many cases, especially for photos, and it handles gradients nicely. The tradeoff is that encoding is slower, and not every tool or server supports it as smoothly yet. If your hosting setup and plugin support it, serving AVIF with a WebP fallback is an excellent setup.
SVG is the right choice for logos, icons, and simple illustrations, but it’s vector-based, so it stays sharp at any size and is often tiny. One caution: WordPress doesn’t allow SVG uploads by default because SVG files can carry malicious code. If you enable them, use a reputable plugin that sanitizes the files.
GIFs should mostly be avoided. Animated GIFs are huge for what they do. A short MP4 or WebM video is usually a fraction of the size.
A practical rule: photos go to WebP (or AVIF where supported), logos and icons go to SVG, and PNG is reserved for cases where you really need lossless detail with transparency.
Step 3: Compress Without Ruining Quality
Compression comes in two flavors, and understanding the difference helps you choose settings with confidence.
Lossless compression strips unnecessary metadata and reorganizes the file data without changing a single pixel. The savings are modest, often somewhere around 5 to 20 percent, but the image is visually identical.
Lossy compression discards some visual information that most people can’t detect. Done well, it can cut file sizes by 60 to 80 percent with little visible change. Done badly, you get blocky artifacts and muddy colors.
For most sites, a moderate lossy setting is the sweet spot. Photos, blog images, and product shots can handle it easily. If you run a photography site or sell high-end visual products, use a gentler setting and check results by eye.
A habit that helps: always keep your original files somewhere safe, either on your computer or in cloud storage. Compression is a one-way trip, and you’ll want the originals if you ever redesign your site or switch formats.
Don’t forget metadata either. Photos carry EXIF data, such as camera model, GPS coordinates, and timestamps. It adds weight, and in some cases it leaks location information you didn’t mean to share. Most optimization tools strip it by default, and it’s worth confirming that yours does.
Step 4: Use an Image Optimization Plugin
Manual work doesn’t scale. If you publish regularly, or if you have a library of hundreds or thousands of existing images, a plugin that compresses and converts images automatically is the practical choice. These are the names you’ll see recommended most often.
Smush is popular and beginner-friendly. It handles compression, lazy loading, and bulk optimization from one dashboard, and the free version covers the basics.
ShortPixel offers both lossy and lossless modes and supports WebP and AVIF conversion. It works on a credit system, which suits sites with moderate upload volume.
Imagify, from the team behind WP Rocket, has a clean interface and simple presets (normal, aggressive, ultra), which makes it easy for non-technical users to choose a sensible level.
EWWW Image Optimizer gives you a lot of control and can run optimization on your own server, which appeals to people who’d rather not send images to a third-party service.
Optimole works differently. It processes and delivers images through its own cloud and CDN, resizing them on the fly to fit each visitor’s screen.
How do you choose? Ask yourself four questions:
- How many images do you upload each month? Credit-based plans can get pricey for high-volume sites.
- Do you want processing on your server or in the cloud? Server-side is private but can strain cheap hosting. Cloud-based is lighter on your server but adds a dependency.
- Do you need WebP and AVIF delivery? Check that the plugin handles fallbacks for older browsers properly.
- Does it work with your caching and CDN setup? Conflicts here cause some of the most frustrating “why are my images broken” moments.
Run only one image optimization plugin at a time. Two plugins compressing the same files can produce double-compressed images with obvious quality loss, plus plenty of confusion when something breaks.
Step 5: Optimize Your Existing Media Library
Most guides focus on new uploads and forget that your old library is probably where the damage is. If your site has been around for a few years, there could be hundreds of unoptimized images sitting in /wp-content/uploads/.
Here’s a sensible way to tackle it:
Back up first. Take a full backup of your site and your uploads folder before running any bulk process. If something goes wrong, you want a clean way back.
Run bulk optimization in batches. Most plugins offer a bulk tool. On shared hosting, process a few hundred images at a time to avoid timeouts.
Convert to WebP or AVIF, keeping originals. The safest plugins create the new versions alongside the originals and serve them to supported browsers, so nothing breaks if you change your mind.
Regenerate thumbnails if needed. If you’ve changed themes, your old images may not match the sizes the new theme asks for. A thumbnail regeneration tool rebuilds the right sizes, so your theme doesn’t stretch or squash images that were cropped for a different layout.
Delete what you don’t need. Unused images, duplicates, and abandoned thumbnail sizes from old plugins just waste space. Clean them out carefully after confirming they aren’t used anywhere.
Once the bulk run finishes, clear your caches and test a few key pages. It’s also worth checking that your images still display properly on mobile, since cached versions sometimes hang around longer than you’d expect.
Step 6: Use Lazy Loading the Right Way
Lazy loading tells the browser to hold off on loading images until the visitor is about to scroll to them. For long pages with many images, it can dramatically cut the initial load.
But there’s a catch that trips up many sites: you should not lazy-load the image at the top of the page. If your hero or featured image is lazy-loaded, the browser delays it on purpose, which hurts your LCP score. The image people see first should load as early as possible.
Recent versions of WordPress handle this better than before, but plugins and page builders sometimes override the behavior. So check your actual pages. Look at your main image in the page source or in the Network panel of your browser’s developer tools. If you see a lazy-loading attribute on your first large image, switch it off for that one. You can also tell the browser it’s a priority image with fetchpriority=”high”, which helps the browser fetch it sooner.
The rule is simple: lazy-load everything below the fold, and prioritize what’s above it.
Step 7: Serve Responsive Images
A phone with a 390-pixel-wide screen doesn’t need the same file as a 27-inch monitor. Responsive images solve this by offering the browser several sizes and letting it pick the best one.
WordPress does this by default through the srcset attribute. When you insert an image through the editor, it adds multiple versions at different widths, and the browser chooses. That’s good news, because you get responsive behavior without writing code.
Where it breaks down:
- Themes or page builders that hard-code a single image URL
- Images added as CSS backgrounds, which don’t get srcset
- Custom HTML blocks where someone pasted a plain image tag
If you notice a mobile page loading the same giant image as desktop, one of these is usually the cause. Fixing it often means using the proper image block or asking your developer to output srcset in the template.
Step 8: Consider an Image CDN
A content delivery network stores copies of your files on servers around the world and delivers them from the location closest to each visitor. For a site with international readers, the improvement can be obvious.
An image CDN goes a step further. It can resize, compress, and convert formats on the fly, so a visitor on a phone gets a small WebP while someone on a desktop gets a larger version, all from the same original. Some optimization plugins include this, and some hosts bundle it too.
You don’t need a CDN to get good results, especially if your audience is concentrated in one region. But if your analytics show visitors spread across continents, it’s worth the setup.
Step 9: Do Image SEO Properly
Speed is half the story. The other half is making sure search engines understand what your images show.
Alt text
Alt text describes an image for people who use screen readers and for search engines that can’t “see” the picture. Write it for a person first. Describe what’s in the image in plain language, and include a keyword only where it fits naturally.
Compare these:
- Bad: image1.jpg with no alt text
- Bad: “wordpress image optimization best wordpress image optimization plugin speed”
- Good: “Before and after file sizes of a photo compressed to WebP”
The second example is keyword stuffing, and it helps no one. The third tells a screen reader user and Google exactly what the image is.
File names
Rename files before uploading. IMG_4821.jpg tells Google nothing. webp-compression-comparison.jpg tells it plenty. Use lowercase, hyphens between words, and keep it short.
Captions and surrounding text
Search engines pay attention to the text near an image. If the image is relevant to the paragraph around it, that reinforces its meaning. Captions are also among the most-read text on a page, so they’re worth using when they add something.
Dimensions and layout shift
Always include width and height attributes, which WordPress does automatically for images added through the editor. This lets the browser reserve the right space before the image loads and prevents that annoying jump.
Image sitemaps and structured data
Many SEO plugins include images in your XML sitemap automatically. If you run an online store, make sure your product schema includes image URLs, because those can appear in rich results.
Common WordPress Image Optimization Mistakes
After looking at enough slow sites, the same issues keep showing up:
Uploading straight from a camera or phone. Raw files are huge, and they’re almost never needed at full size.
Using PNG for photographs. It looks fine, but the file can be five times heavier than a WebP.
Stacking optimization plugins. Two tools fighting over the same files cause quality loss and weird bugs.
Lazy-loading the hero image. It makes the page feel slower where it matters most.
Forgetting about sliders and backgrounds. Slider plugins often load every slide at full size upfront, and background images set in CSS may skip optimization entirely.
Ignoring mobile. Testing only on a fast desktop connection hides most of the issues your visitors actually face.
Never rechecking. New plugins, theme updates, and fresh content can quietly undo your hard work. Test every few months again.
How to Test Whether It’s Working
You don’t have to guess. Run a few key pages through Google PageSpeed Insights and look at the recommendations about properly sizing images, serving next-gen formats, and efficiently encoding images. Check the LCP element it identifies; it’ll often tell you exactly which image is the bottleneck.
GTmetrix and WebPageTest are useful for a closer look at what loads and in what order. In your browser’s developer tools, open the Network tab, filter by images, and sort by size. The biggest files at the top are your targets.
Test on mobile specifically, and test on a throttled connection if you can. Your visitors aren’t all on fiber.
A Simple Workflow You Can Follow
If you want something repeatable, here’s an approach that holds up:
- Resize the image to the width you’ll actually need
- Give it a descriptive filename
- Upload it and write clear alt text
- Let your optimization plugin compress it and create a WebP or AVIF version
- Confirm the first image on the page isn’t lazy-loaded
- Check the page in PageSpeed Insights once it’s live
Once it becomes a habit, the whole thing adds maybe a minute per post.
WordPress image optimization isn’t glamorous, but it’s one of the most dependable ways to make your site faster. Resize before you upload, choose modern formats, compress sensibly, load images in the right order, and describe them properly. Do that consistently and your pages will feel quicker, your readers will stick around longer, and your search visibility will have a stronger foundation.
Where WPAegis Fits In
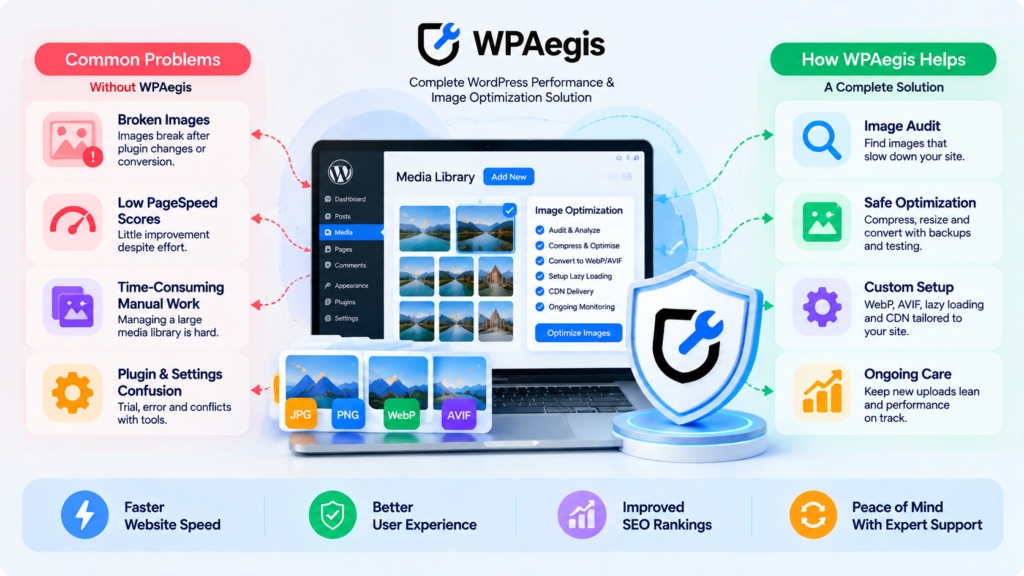
Plenty of site owners handle WordPress image optimization themselves without trouble. But I also hear the same frustrations again and again. Someone installs a plugin, converts a thousand images, and finds half of them broken on mobile. Someone else sees their Page Speed score barely move and can’t work out why. Others simply don’t have the time to babysit a media library.
That’s the gap WPAegis is built to close. Instead of leaving you to experiment with settings and hope for the best, WPAegis gives you a practical, hands-on approach to WordPress performance. We look at your actual site, find the images that are dragging it down, fix how they’re sized, formatted, and delivered, and make sure the improvements survive the next theme update or plugin change.
What that means in practice:
- A real audit of your images, so you know which ones are costing you speed instead of guessing
- Clean, safe optimization of your existing library, with backups and testing so nothing breaks
- Setup that fits your site, whether that means WebP, AVIF, lazy loading adjustments, or a CDN
- Ongoing care, so new uploads stay lean, and your scores don’t slowly slide back.
If you’d rather skip the experimenting, or you’ve tried and the results still aren’t where they should be, WPAegis is here to help. Let us take a proper look at your site.
Frequently Asked Questions
It depends on where the image appears for in-post images, 1200 to 1600 pixels wide is plenty for most themes. Featured and hero images usually work well at 1600 to 2000 pixels. Check your theme’s content width and aim for about double that to cover high-resolution screens, rather than uploading anything larger.
Partly. WordPress compresses the resized copies it generates and scales down very large uploads, but it doesn’t do aggressive compression or convert your older images to modern formats. For that, you’ll want an optimization plugin or a service that handles it for you.
For most websites, yes. WebP usually gives you smaller files at similar visual quality and works in every modern browser. WordPress has supported WebP uploads since version 5.8, so there’s little reason not to use it, especially for photos.
Images are a big factor but not the only one. Slow hosting, heavy themes, too many plugins, render-blocking scripts, and missing caching can all hold you back. Check PageSpeed Insights to see which issues remain. It’s also possible your hero image is still being lazy-loaded, or that a slider is loading full-size files in the background.
You can get far with manual resizing and compression before upload, but it’s tedious and easy to forget. A plugin automates the work and handles older images, which is where most of the weight tends to be hiding. For any site that publishes regularly, it’s worth having.
Yes, in two ways. Faster pages improve the experience Google measures through Core Web Vitals, and well-described images with good alt text and filenames can appear in image search. Neither replaces strong content, but both support it.


Leave a Reply