


Every WordPress owner has a version of this story. You update a plugin on a Tuesday afternoon, everything looks fine for about ten minutes, and then someone emails you saying the checkout page is blank. Or the menu vanished. Or the homepage is showing raw PHP code instead of your beautifully designed layout.
A staging environment is how you stop living that story on repeat.
In plain terms, a WordPress staging environment is a private copy of your website, usually sitting on a separate URL like staging.yoursite.com or yoursite.com/staging, where you can test updates, new plugins, design tweaks, or code changes before they ever touch the site your customers actually see. Same theme. Same plugins. As close to the same server setup as you can get.
If your site takes payments, collects leads, or matters to your business, staging is one of the cheapest insurance policies you’ll ever buy. In this guide, we’ll walk through what staging actually does, how to set it up (three different ways, depending on your comfort level and budget), and how to avoid the mistakes that quietly ruin most staging setups.
What a Staging Site Really Is:
A staging site is not the same thing as WordPress’s built-in draft or preview feature. If you want to see what a blog post looks like before hitting publish, you don’t need staging; the Preview button already does that
Staging exists for a different job: testing technical changes. Plugin updates, theme changes, PHP version upgrades, new integrations, custom code, server configuration tweaks. Test anything that could break something behind the scenes on staging first to keep your site safe.
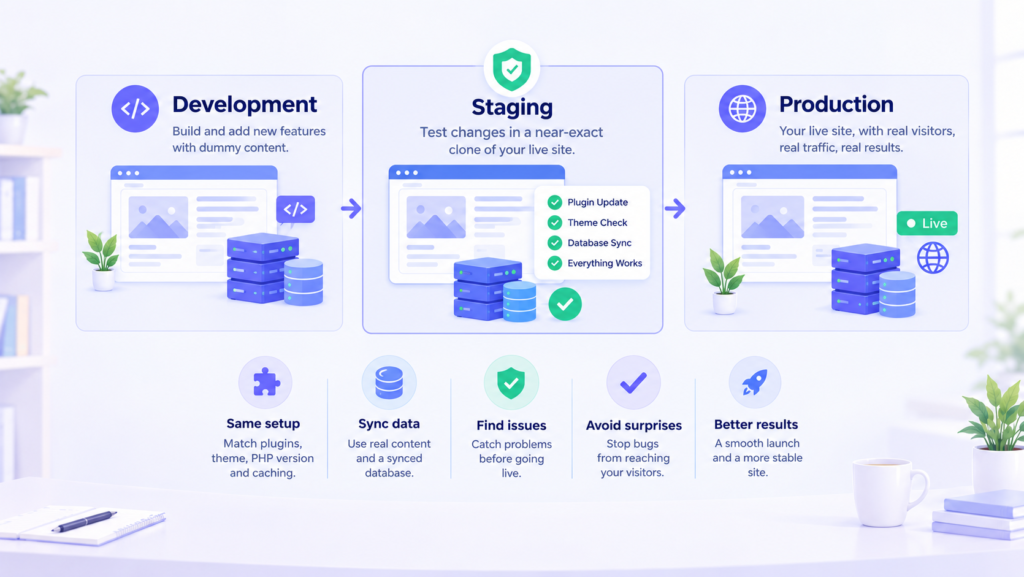
Think of it as connecting other environments:
- Development is where a feature gets built, usually with dummy content and a developer poking around with debugging tools turned on.
- Staging is where that feature meets a near-exact clone of your live site, so you can see how it behaves under real conditions.
- Production is your live site, where actual visitors browse, buy, and form an opinion of your business in about four seconds.
The whole point of staging collapses if it doesn’t resemble production closely enough. I’ve seen plenty of “staging sites” that were really just a different install with a different PHP version, no caching plugin, and half the plugins missing. People test on that; everything passes without any errors, they push to live, and the exact thing they didn’t test is what breaks.
Staging only earns its keep when it’s close enough to your real site to surface real problems, but if you don’t have the same setup on staging, you are making a huge mistake.
Why Staging Actually Matters:
Save your site from failing in public:
Updates aren’t always as harmless as they look. A plugin update can quietly restructure database tables. A theme update can remove a template file your homepage depends on. A new caching plugin can start minifying JavaScript files and break your navigation menu without throwing a single visible error, until a customer tells you your site is “acting weird.”
But on a staging site, none of that matters because nobody is seeing it, and you can break things as badly as you want, because nobody’s watching except you.
It Catches Conflicts Before They Cost You Money
Plugin A doesn’t get along with Plugin B. Your theme overrides a WooCommerce template in a way that breaks after an update. A REST API call starts failing silently. These conflicts rarely show up until you actually click around the site like a real visitor would, and staging is where you get to do that without consequences.
It Lets You Actually Plan a Release Instead of Winging It
Staging gives you room for safe testing. You can note exactly what changed, decide the order updates should happen in (some plugins genuinely need to go first), and define what “done” looks like before you call it done: checkout works, forms submit, search returns results, login works.
It pairs naturally with backups, but it isn’t a replacement for them. If your entire rollback plan is “copy staging back over the live site,” you’re fine right up until new orders or blog posts show up on production that never existed on staging. Then you’re not rolling back; you’re deleting real business activity.
Clients (and Bosses) Stop Getting Surprised
If you’ve ever gotten the email that starts with “why does the homepage look different and nobody told me?” staging solves that. You send a private link, gather feedback, make adjustments, and only then does anything become public. Password-protect it and block search engines from indexing it, and nobody outside your team ever sees the messy middle of a redesign.
Let Wpaegis handle your task:
Most real WordPress sites aren’t just ordinary blog pages because they’re plugged into payment gateways, shipping calculators, membership systems, email marketing tools, CRMs, and analytics platforms. Staging is where you confirm those connections survive an update, ideally using sandbox credentials (Stripe test mode, PayPal sandbox, and so on) rather than your live payment keys.
This is exactly the kind of ongoing technical oversight that eats up a business owner’s time, and it’s the reason services like WPAegis exist. Our team handles the update testing, the security monitoring, and the “did this plugin update break checkout” investigations so you’re not the one staying up late refreshing your staging URL.
How to Build a WordPress Staging Site:
There’s no single “correct” method, but it depends on your hosting, how technical you are, and how often you’re making changes.
Method 1: Your Host’s Built-In Staging Tool
If your hosting plan includes staging, this is usually the fastest route to something usable.
The typical flow looks like this: log into your hosting dashboard, find the WordPress site manager, select the correct site (double-check you’re cloning production and not an old staging copy), click “Create Staging,” and choose whether it lives on a subdomain or a subdirectory. Once the clone finishes, lock it down with a password and enable the “discourage search engines” setting. Then check that the theme, plugins, media, permalinks, and admin login all behave the way they should.
There are usually two modes:
- A full push (files and database) replaces everything on production with what’s on staging.
- A selective push moves only files, only the database, or specific tables.
For a simple brochure site, a full push is usually harmless. For an online store or membership site, a careless full database push can wipe out new orders, new customer accounts, password resets, and form submissions that happened on the live site after you cloned it. Before you push anything, know exactly what’s about to get overwritten.
Method 2: A Staging Plugin
If your host doesn’t offer staging, or its version is limited, a plugin can get you most of the way there, particularly useful on shared hosting where you don’t have server-level access.
This route makes sense when there’s no host-level staging feature, you need a quick one-off test, or switching hosts isn’t realistic right now.
Popular tools include WP Staging, which is generally straightforward for cloning into a subdirectory, and Duplicator, which is strong for migrations but needs a bit more care during setup.
The general workflow: install and activate the plugin, create a new staging instance (a subdirectory is common since it avoids DNS complications), choose what gets copied (database tables, the uploads folder, plugins and themes), run the clone, and if it fails, trim the scope, skip cache folders, logs, and old backup files. Once staging is live, run through a quick checklist: permalinks working, forms submitting somewhere safe, member areas functioning. Then make your changes, take notes, and deploy, often manually, since many plugins don’t offer a clean one-click push to live.
Also worth doing before you clone anything: clean out old backup archives sitting in wp-content (UpdraftPlus, All-in-One WP Migration, and similar plugins tend to leave multi-gigabyte zip files lying around). Cloning several gigabytes of dead weight is a common reason clones run out of disk space or simply time out.
Method 3: Manual Setup via Panel
This is the most flexible option, and also the easiest to get wrong. If you’re comfortable with files and databases, though, it’s dependable, especially when plugin-based tools keep failing on a large site.
Reach for this when you need staging that closely matches production’s exact configuration, the site is too big for plugin tools to handle, or you want full control over what gets copied.
On typical shared hosting, the process looks like this: create a subdomain (staging.yoursite.com), create a fresh database and database user, copy the WordPress files across (File Manager for small sites, SFTP or SSH for anything bigger), export the production database, import it into the new staging database, update wp-config.php with the new credentials, and run a URL replace from your live domain to the staging domain, using a tool that correctly handles serialized data. Finish by password-protecting the subdomain, enabling “discourage search engines,” and turning off outbound email and webhooks so staging doesn’t quietly trigger real-world side effects.
A subdomain tends to behave more predictably than a subdirectory, particularly for WooCommerce or membership sites where cookies, sessions, and rewrite rules matter. Some plugins assume the site lives at the root domain and act strangely when it’s nested inside a subdirectory.
The most common manual mistakes: forgetting to update the site’s home and site URLs (leading to redirect loops), copying wp-config.php without regenerating the security salts and keys (causing odd session behavior), and forgetting to block cron jobs or webhooks, which is exactly how staging sites end up sending thousands of real “abandoned cart” emails to actual customers. It’s rarely malicious. It’s usually just someone testing a checkout flow without turning off outgoing mail first.
If setting up and maintaining any of these three methods sounds like more than you want on your plate, that’s precisely the kind of ongoing technical maintenance our team at WPAegis takes off your hands, from safe staging deployment to managed core updates and daily backups, so you’re not the one troubleshooting a broken cron job at 11 pm.
Handling Staging on Very Large Sites
Cloning a small brochure site is trivial. Cloning a large WordPress installation, think hundreds of thousands of database rows, a media library measured in gigabytes, and a dozen custom plugins, is a different problem entirely.
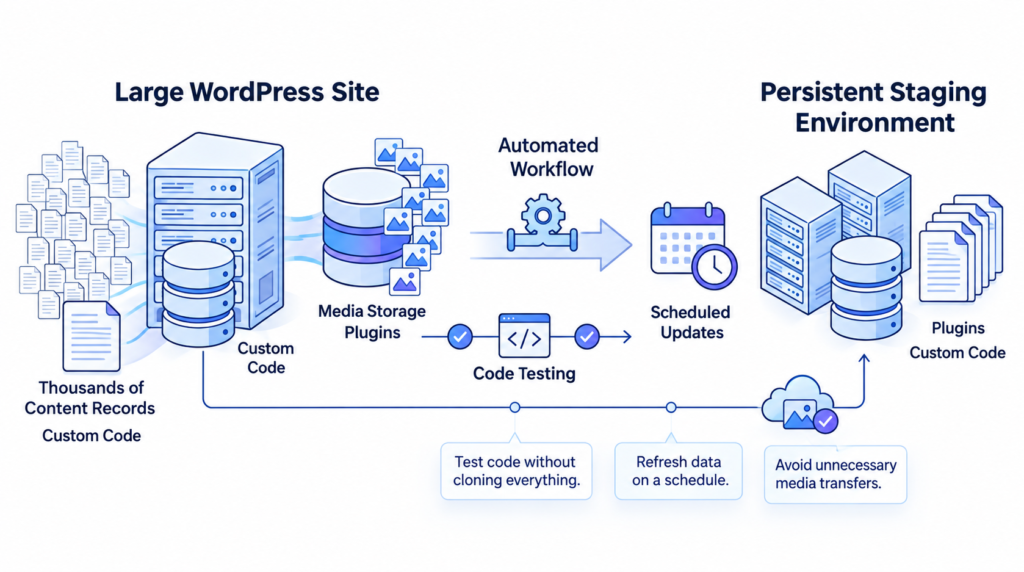
On big sites, the smarter approach usually isn’t “clone everything, every time.” Instead, separate code testing from content testing. Your theme, plugins, and custom code changes can be tested against a staging database that’s a recent-but-not-perfectly-current snapshot, refreshed on a schedule rather than constantly.
Content changes- new posts, product updates- often don’t need staging at all if your editorial workflow already uses drafts and previews correctly.
For genuinely large sites, a few practices consistently save people headaches:
- Keep a dedicated staging environment that persists, rather than spinning up a fresh clone for every single change. Constant full clones on a large site burn hours and server resources you don’t have to spend.
- Refresh the staging database on a set schedule (weekly is common) rather than trying to keep it in perfect real-time sync with production; perfect sync usually isn’t necessary for testing code and plugin behavior.
- Exclude the media library from routine refreshes where possible. Syncing gigabytes of images every time you want to test a plugin update is often unnecessary; a symlink or shared media path can save enormous amounts of time.
- Automate the deployment pipeline as much as you can: Git-based deployments for code, paired with a documented, repeatable process for anything that touches the database.
This is also where a lot of long-term staging setups start showing wear: staging environments that sit around for months without maintenance tend to drift so far from production that they stop being useful for catching real bugs. If nobody’s actively responsible for keeping the theme, plugins, and PHP version in sync between staging and live, staging quietly turns into a stale, disconnected copy of the site from three months ago, which defeats the entire purpose.
Where This Gets Genuinely Time-Consuming And Where WPAegis will help you:
Reading through all of this, you’ve probably noticed a pattern: staging isn’t hard to understand, but it’s tedious to do consistently. Cloning correctly, keeping staging in sync month after month, remembering to turn off outbound email, testing every update against a proper checklist, and maintaining a real rollback plan- none of it is complicated on its own. Still, all of it takes ongoing attention that’s easy to deprioritize when you’re busy running the actual business.
That’s the gap WPAegis is built to close. Our WordPress care plans handle the recurring, unglamorous work that keeps a site stable long-term: daily automated backups so you always have a clean restore point before any deployment, managed core and plugin updates tested properly rather than applied unthinkingly to production, 24/7 security monitoring so a staging or live environment left briefly exposed doesn’t turn into a bigger problem, and performance optimization so your site stays fast even as plugins and content pile up over time.
If you’d rather focus on your business than on whether last night’s plugin update quietly broke something, our plans are worth a look.
Conclusion
If you’re running a WordPress site that matters to your revenue, your reputation, or your customers, staging isn’t optional anymore. It’s how you keep control when updates, plugins, and themes inevitably do something unexpected.
A practical rule of thumb: use your host’s built-in staging tool if it supports selective pushes and proper privacy controls. If it doesn’t, or your host doesn’t offer one, a staging plugin will cover most day-to-day needs. And if you’re running something high-value- a WooCommerce store, a membership site, anything with real traffic- it’s worth investing the time in a proper staging setup with a documented, repeatable deployment process.
Next time you’re about to make a significant change to your site, make it a rule: stage first, ship second. And if maintaining that discipline consistently sounds like more than you want to manage yourself, WPAegis is here to take that off your plate.
Real Questions WordPress Users Ask About Staging
Q: What should I actually expect from a staging environment, and what does it and doesn’t it guarantee?
A staging environment gives you a private, realistic place to test changes before they go live, but it isn’t a perfect guarantee that nothing will ever break in production.
But it can catch most issues that can break your site, like plugin conflicts, theme issues, and obvious bugs. Don’t expect it to catch major and minor issues, particularly anything tied to real production traffic, live payment processing, or server-level configuration that differs slightly from staging. The closer staging mirrors your live environment (same PHP version, same caching setup, same plugin versions), the more you can trust what it tells you. If staging and live have drifted apart, treat any “it worked on staging” result with a bit of healthy skepticism.
Q: How do I handle staging when it needs to exist long-term rather than just for a single project or launch?
Long-term staging environments fail for a predictable reason: nobody keeps them updated once the original project wraps up because after that you put all our focus on the live site. Treat staging as a standing piece of infrastructure with its own maintenance schedule, regular database refreshes, plugin and theme version checks, and periodic review of what’s excluded from syncing (cache folders, logs, old backups tend to accumulate). It also helps to revisit access and password protection periodically; staging environments that sit around for months sometimes end up with outdated credentials or accidentally get left publicly accessible after a hosting change.
Q: What are the actual best practices for promoting changes from staging to a live site without breaking things?
Push deliberately, not automatically. If your site takes orders, form submissions, or new user signups, avoid a full database push; it can silently overwrite anything that happened on live since you cloned staging. Push files and database separately when that risk exists, back up production immediately before deploying (even with scheduled backups already in place), and deploy during low-traffic hours rather than peak times. Test the live site immediately after pushing rather than assuming a successful push means a working site, and always have a tested rollback plan ready- not just a backup that exists, but one you actually know how to restore quickly if something goes wrong.

Leave a Reply